Appearance
System settings
Organization Profile
Update Organization details
To change your organization details, simply:
- Go to the Settings module and under system settings,you will find 'Organization Profile' section.
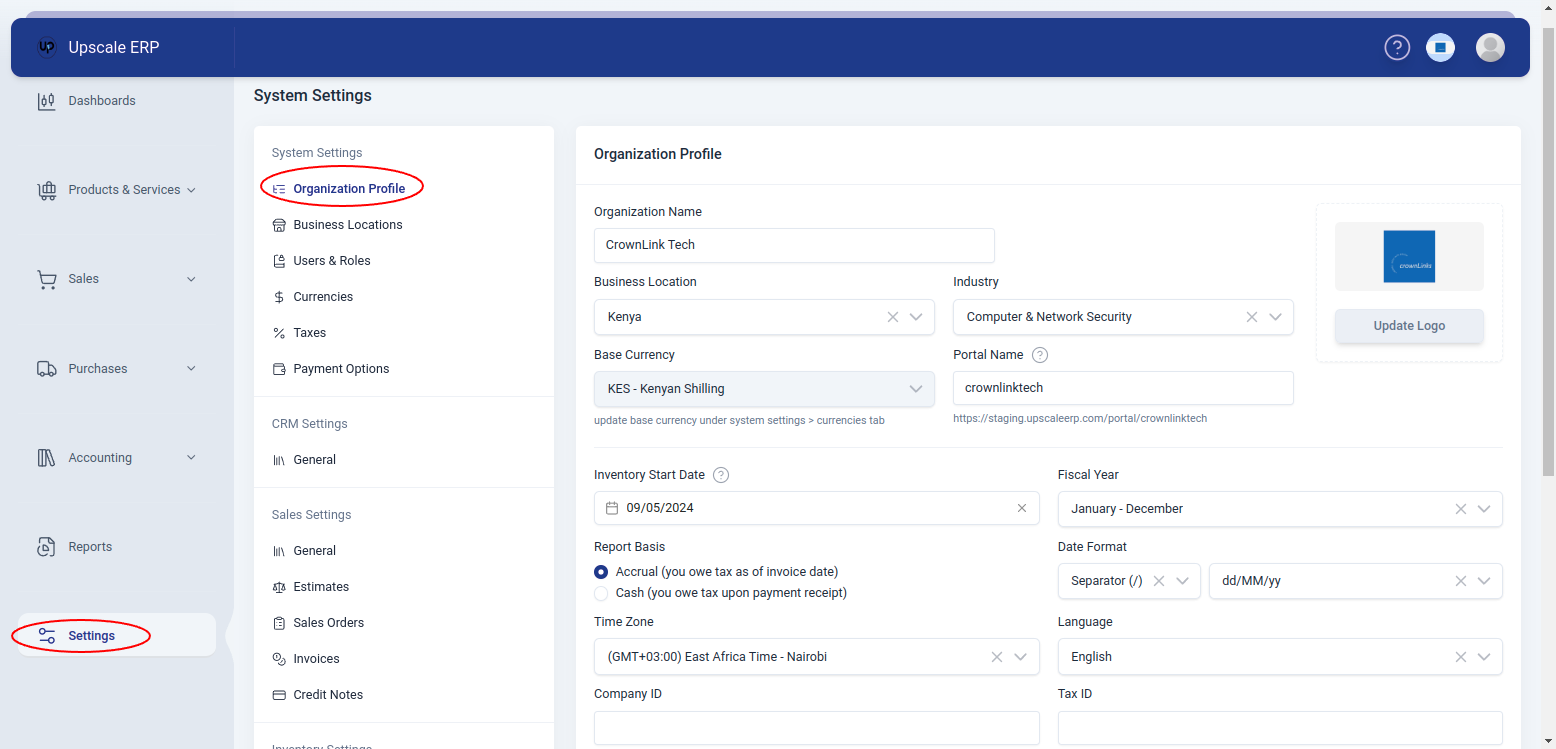
- You can edit in/out the changes you want and when done,click on "Update Profile" button.
Organization Users
An Organization User: is anybody with access to your Upscale ERP organization. In Upscale ERP, an organization may have more than one user.
Go to Settings > System Settings > Users & Roles
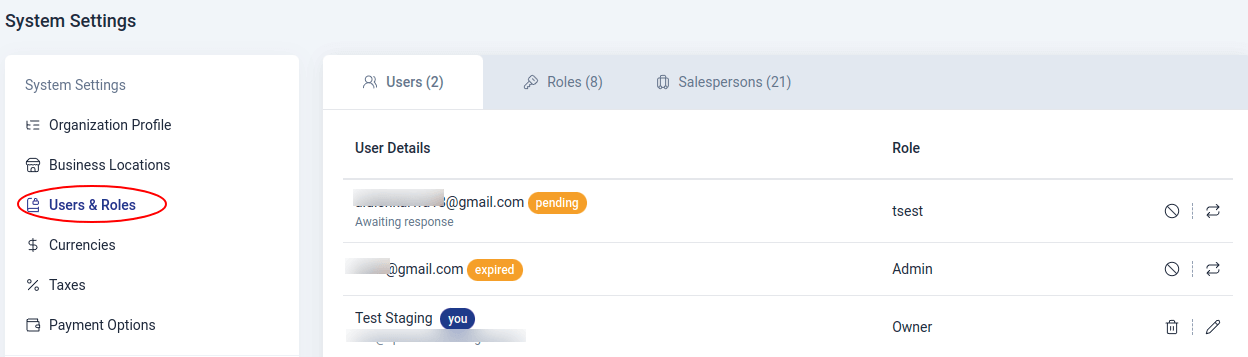
Adding an Organization User
You take on the role of your organization's default administrator when you create an Upscale ERP account. You can add several users with various roles to your organization after you are an administrator. Here's how to go about it:
- On the sidebar, select Settings.
- Navigate to 'System Settings' and choose 'Users & Roles', click on 'Users' tab.
- Scroll to the bottom of the page and select the button 'Invite User'.
- Enter the email address, and user role when inviting them to join your organization.
- Press 'Invite' when done.
Following this, the new user will receive an email from you requiring them to confirm the link and create a password in order to access your Upscale ERP account.
Cancel/Resend invite
You can always cancel an invite or resend it using the cancel/resend icons on the right of the selected user.
User Roles
User Role: A role in an organization is the degree of accessibility that a user can have. Standard jobs in Upscale ERP may include Admin, Staff or even managers.
Adding an Access Role
To add access roles in your organization:
- Navigate to Settings module on the sidebar.
- Click on 'Users & Roles' under system settings page.
- Select 'Roles' from the top bar.
- To create access roles, click on 'Add Access Role' button at the bottom of the roles page.
- Select the modules and click on the level of access you want to provide for the role.
- On some modules,you'll see three dots which are for more permissions for additional access points.
- Click on 'Create' when you're done.
Cloning an Access Role
You can always clone an already existing role using the icon to the far right of the selected role.You can use this to create a similar role for another user.

Editing User/Role
To edit a user/role, simply click on the pen icon on the selected role and edit in/out the changes and when you're done click on 'Update'.
Deleting User/Role
To delete a user/role, click on the trash icon and if sure about it click on 'Ok'.
Salespersons
A Salesperson is a professional responsible for selling products or services to customers.
Adding Salesperson
To add a salesperson,
- Click on 'Users & Roles' section in 'System Settings' section, then select the 'Salespersons' tab
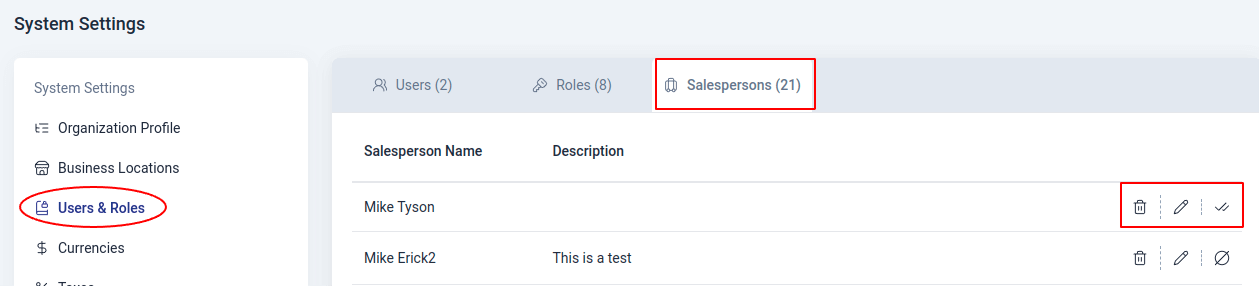
- Then click on 'Add Salesperson' button and fill in the salesperson details in the popup window. Click the 'Add' button to save the salespersons details.
Editing Salespersons
To edit the salesperson details,
- Click on the pen icon. Update the salesperson details on the popup window and click 'Update' button to save the changes.
Mark As Active Salespersons
To mark a salesperson as active or inactive,
- Click on the mark icon and confirm 'Ok' in the popup window to complete the action.
Deleting Salespersons
To delete a salesperson,
- Click on the trash icon and confirm Ok on in the popup window to complete the action.
Currencies
You can create sales and purchase transactions for your contacts in currencies other than your base currency in Upscale ERP.
Base Currency
The business location that you choose when establishing your organization will define its default currency. We refer to this money as your base currency. For instance, the default currency will be Kenyan shillings (Kshs) if Kenya is your business location.
To view your organization's base currency:
- Click on Settings on the sidebar
- Navigate to 'System Settings' and click on 'Currencies'.
Apart from the base currency, Upscale ERP contains a default list of other currencies as well.
Adding a new currency
To add a new currency,
- Scroll to the bottom of the page and click on the 'Add Currency' button.
- Choose the currency code and the rest of the fields will populate.
- You can change the decimal places or format to your liking.
- Click 'Add' when done.
| Field Name | Description |
|---|---|
| Currency Code | Choose and select the currency you want to add. |
| Currency Symbol | Populated based on the currency selected.It can be changed to your liking. |
| Decimal Places | Select the number of decimal places. |
| Format | Choose and select laces where the commas(,) and dots(.) appear in the currency you're adding. |
Editing Currency
To edit an existing currency,
- Click on the pen symbol that is to the right of the chosen currency.
- Edit the changes you want to the currency
- Click on 'Update' when done.

Deleting Currency
To delete a currency,
- Select the trash icon to the right of the currency,beside the edit feature.
- Click on 'Ok' if sure.
Taxes
You enter taxes here that are used in your business.
Adding Tax
To add tax,
- On the sidebar, select Settings.
- Navigate to 'System Settings' and choose 'Taxes'.
- Scroll to the bottom of the page and click on the 'Add Tax' button.
- Input the tax name and rate.
- If you charge a second tax in addition to the primary tax,choose the option 'Compound Tax'
- Select Add when done.
Editing Tax
To edit tax,
- Click on the pen icon to the right of the tax and edit in/out the changes.
- When done,click on 'Update'
Deleting a Tax
To delete a tax,
- Click on the trash icon to the right of the tax beside the edit icon.
- If sure about it click on 'Ok'.
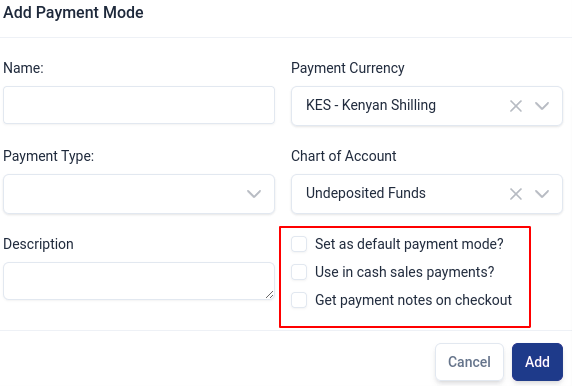
Payment Options
Here,you can set up a payment mode for your organization with details like name,payment currency, payment type, chart of account and description.
Go to Settings > System Settings > Payment Options
Adding a payment mode
To add a payment mode,scroll to the bottom of the payment options page and click on "Add Payment Mode" button, fill in all the required details and click on 'Add' when done.
When creating a payment mode, you can customize it by,
- setting it as a default payment mode
- setting it to be used in cash sales payments
- getting payment notes on checkout.
Editing Payment Mode
- To edit a payment mode, simply click on the pen icon and edit in/out the changes and when you're done click on 'Update'.
Deleting Payment Mode
- To delete, click on the trash icon and if sure about it click on 'Ok' to complete the action.